
What Are The Different Parts Of The 3D Printers?
I’ve been fascinated by the 3D printing concept for a while now. The idea of having something that can be altered so easily and so precisely is amazing. But what does that mean for me as a person, someone who isn’t particularly technical? Does this technology hold promise or should it be avoided at all costs?
The first thing you need to know about 3D printing is that there are various types available, depending on your budget and needs. You have the low-cost consumer printers, which come in many shapes, sizes, and colors; the mid-range industrial machines; and, of course, the high-end machines used by professionals.
For our purposes, we’re going to focus on the consumer models. While they aren’t quite as precise as their more expensive counterparts, they do offer an affordable entry point into 3D printing. In fact, one of the most popular options with newcomers to the field is the MakerBot Replicator 2 Desktop 3D Printer.
What Are All These Parts Called Anyway?
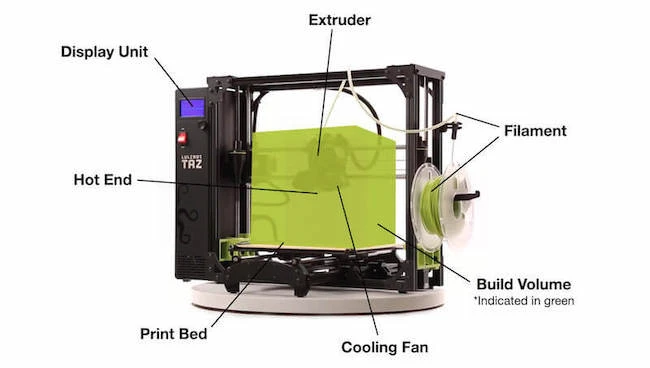
A typical 3D printer consists of four main parts (or pieces):
1) A computer
2) A 3D printer head
3) Build platform
4) Build material
If person is planning to get the 3d printer under $500, he must have the complete detail. There are different parts of the printers that are essential for the working. The try of the person must be to use the printers with different parts. In the long run it will be beneficial.
The build platform is the part that rests on top of the 3D printer head. That’s where you place your objects, either from a file on your computer or from actual physical materials. The build platform also has a hole that allows your objects to pass through, so you don’t even necessarily need to print them out first. If you have a file on your computer, you simply drag it onto the build platform.
Once you’ve created your object, you’ll use a tool called a slicer to create a layer by layer representation of your design. This process is called slicing. Once you have sliced your file, you’ll load the.stl file into the 3D printer head. From there, the machine will start to extrude layers of plastic until you’re left with your finished product.
But What Is It Exactly?
It’s simple enough, really. It takes a digital file like a CAD drawing and turns it into a three-dimensional object. For example, if you designed a model of a house, you could send it to your printer to make a replica of your home. Or if you were designing a car, you would send it to your printer to make a scale model of your dream ride.
Depending on the type of printer you choose, you might only get one copy of each object printed, but 3D printers can produce hundreds or thousands of copies. And since they can be programmed to work together, you can print multiple things simultaneously.
Why Use 3D Printing Instead Of Other Materials?
There are a few reasons to consider using a 3D printer instead of other forms of manufacturing. First of all, it’s easy to use. No messy glues or paints required. Just drop whatever you want to manufacture into the machine and wait for it to spit out your creation. The only tools you need are scissors and glue sticks.
You can customize everything. This is one of the coolest features of 3D printing. When you design something, you can change its shape, size, color, and texture. You can even alter the surface properties such as roughness or smoothness. Plus, you can add holes and other features to make it unique.
And if you mess up, you can just reprint it again. Because it’s digital, you can re-slice and re-print your design without any loss of quality.
Finally, there’s no waste. When you have a 3D printer, you never run out of materials. There’s nothing left over when you’re done making your project — not even plastic scraps.
However, since 3D printers require some level of technical knowledge, they aren’t ideal for beginners.
What Kinds Of Files Should I Send To My 3D Printer?
When you download files from online resources, such as Shapeways, you can upload them directly to your 3D printer. However, you’ll usually have to create your own designs in some kind of software before you send them to your printer. Most commonly, you’ll use a program called a slicer.
Slicers allow you to take a file and turn it into a series of steps that the printer uses to build your object. They’re very similar to spreadsheets, except that instead of cells, they use layers. You’ll set up your slices in the slicer, then save your file. Next time you connect your printer to the Internet, you’ll upload your new file to the printer.
So How Do I Start Using 3D Printing?
If you’d like to learn how to 3D print, you’ll need a few items:
1) An idea
2) A compatible printer
3) Some sort of slicer software
The easiest way to get started is to find free software online. There are tons of slicers available, including those built right into Microsoft Office programs.
Once you have your slicer ready, you’ll need to prepare your files. Depending on the kind of file you’re sending, you may need to convert it to a format compatible with your slicer. There are several websites dedicated to doing this for you, such as 3DLToys.com. You can also download free software to help you prepare your files.
Once you have your file in a good state, you can begin sending it to your printer. Remember, you can always adjust your file and resubmit it.
But what happens after my design is printed?
After you receive your finished product, you’ll probably want to put it to use! You could mount it on your wall or display it in your home. Or you could make yourself some jewelry or other small items. Whatever you decide to do, you’ll have an awesome souvenir of your new toy.
That’s all there is to start with 3D printing! As I mentioned earlier, there are plenty of great sites out there dedicated to providing free tutorials and information about 3D printing. For instance, check out the website 3dprinters.org. Also, if you have any questions about 3D printing, feel free to ask them in the comments below!